Immediately Exporting Documents (Simple or with Metadata)
Important: Exporting documents is an optional feature depending on your Policy & Procedure Management license. If you have questions about or want to purchase the Export Documents module, contact NAVEX Customer Support by submitting a request in the Community.
The Export Documents module includes a certain number of exports per year. Each time you perform an export, regardless of its type (single export, export with metadata, or Emergency Document Access), you use one of your annual export instances. If no documents meet the selection criteria, the export cancels and no files are sent to SFTP. An email notification is sent to the user and the total allowed number of allowed exports is not increased.
The process for selecting documents for a simple export or an export with metadata consists of displaying a narrowed list of documents and then selecting from that list the documents you want to export. The export file for a simple export contains documents in their original file format and can include Word documents in PDF format. The export file for documents with metadata includes an Excel spreadsheet containing information about each document (document owner, task assignees, date created, and the like). This includes a Summary Report and All Versions option.
Important: Exported documents are no longer under version control.
Export EDA documents immediately
- Click Settings & Tools > Tools, and then click Data Exports.
- Expand the Document Exports pane, and then click Start New Immediate Export.
-
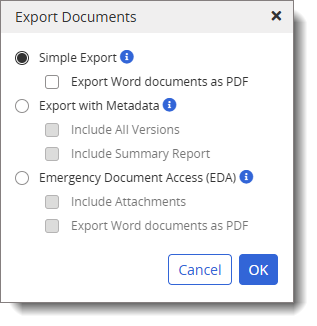
In the Export Documents menu, do one of the following:
-
To export the selected documents in their original file formats, click Simple Export. This option compresses multiple documents into a .zip file. You can also export Word documents as PDFs if desired.
-
To export the selected documents along with an Excel spreadsheet containing document metadata, select Export with Metadata. You have the options to Include All Versions (instead of only the latest version) and Include Summary Report for each selected document that shows the document's properties and history in the export file.
Note: If you exported documents with their metadata and chose to include summary reports, you can find those reports in a folder named SummaryAndAttachments after extracting the contents of the exported zip file.
Important: The Export with Metadata option can facilitate moving (exporting and then importing) documents from one Policy & Procedure Management system to another. Before moving documents from one Policy & Procedure Management system to another, we suggest you contact NAVEX Customer Support by submitting a request in the Community for assistance to avoid any adverse effects.
-
- Click OK.
- For Status, select All Statuses or if a group of documents you want to export are all in the same workflow status, select that status from the available list.
- (Optional) By default, documents with a security setting of Restricted - High or Restricted - Severe are not available for inclusion in the export. If desired, you can select Show Restricted Content.
- For Site, select a site containing the documents you want to include in the export.
- (Optional) Click Add All From Selected Site(s) to include all documents from the site.
- (Optional) Click Add All From All Sites to include all documents in the currently selected status from all sites.
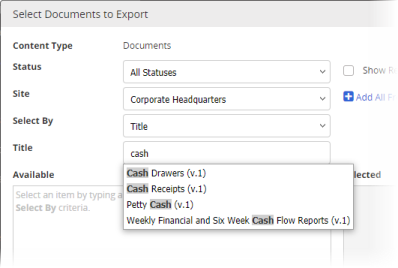
- For Select By, select an option for how you want to find documents.

- If you chose Title or Reference # for Select By, start typing text that you believe is in a document's title or reference number. When you have typed at least three characters, a list appears of titles or reference numbers matching what you have typed. Continue typing if you need to narrow the list. As soon as you see the title or reference number you want, click it.
Note: Unlike other Select By options, the Title and Reference # options limit you to selecting documents one at a time.
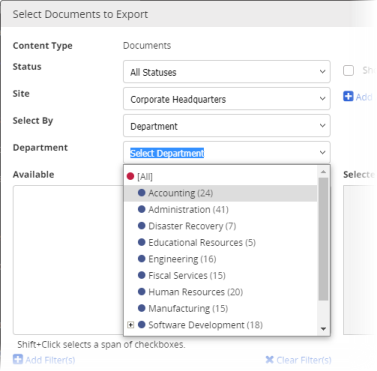
- If you chose any of the other Select By options, in the field below Select By, click an item to display all documents assigned to that item. For example, if you chose Department for Select By, then in the Department list, click a department to display all documents assigned to that department or click Add All From [department name].
- If you chose Title or Reference # for Select By, start typing text that you believe is in a document's title or reference number. When you have typed at least three characters, a list appears of titles or reference numbers matching what you have typed. Continue typing if you need to narrow the list. As soon as you see the title or reference number you want, click it.
- Add documents to the Selected pane.
- Select individual documents from the Available list.
- To quickly add all documents from the list, click Add All From [Select By item].

- (Optional) To add one or more date-related filters to narrow a long list of documents, click Add Filter(s), in the Filters dialog box, do any of the following, and then click Apply.
- For Filter By, select an option.
- For Date Range, select a range.
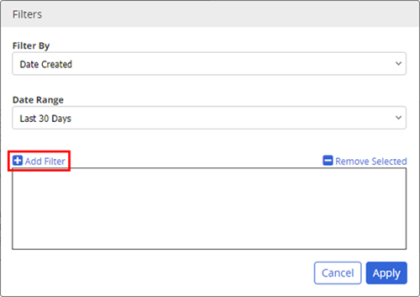
Note: Repeat to add another filter to work in combination with the first filter. For example, you might want to filter for only those documents created within the last 90 days and published within the last 30 days. Filters have no effect if you selected Add All From Selected Site(s) or Add All From All Sites.
- Click OK. An Export In Process bar displays. The time it takes to complete the export depends on the number and size of the documents.
- When the export completes, click the Exports Ready To Download link. A file saves to your Downloads folder.
- Extract the .zip file contents to a location of your choice. Open the folder to access the documents and any applicable attachments.
This publication was written and produced at NAVEX Global, Inc., Lake Oswego, Oregon. This publication or any portion thereof is confidential and/or proprietary and may not be reproduced or used in any manner whatsoever without the express written permission of NAVEX Global, Inc.
Copyright © 2025 NAVEX Global, Inc. NAVEX Global® is a registered trademark/service mark of NAVEX Global, Inc. The NAVEX Global® logo is a trademark/service mark of NAVEX Global, Inc. Unauthorized use of NAVEX Global, Inc.’s trademarks/service marks is strictly prohibited without prior written permission from NAVEX Global, Inc.